The ISC attack the Alliance BATS. Looking at the other front I can see I need to do well here, as other wise the coalition are going to be closing on the alliance home faster than me.
The battle looks very interesting.
On the Alliance pro side:
They have 7 scout channels to my none.
They have 26 drone racks with a possible 72 control limit.
2 Feds and a Gorn cruiser can deliver serious crunch as I try to close.
He also has significant long range fire power with plenty of phasers and some disrupters.
So, I have to fight my way through an area of space lit up bright by the flare of drone engines (in space the 'we will fight in the shade' quote doesn't quite work

), suffer a punishing long range engagment where his sensors ensure I do little in return, and then deal with photons and some plasma as well as Phaser 4s.
On the ISC pro side:
I have 12 plasma S.
And that is probably it.
I have a lot of phaser 1s but they will be hurt badly by the scout channels and may be shooting drones. The PPDS will also suffer to scout channels, especially at range, and 5 PPDS are not really that good at this level of fight (over 1000 pts per side) - his 8 photons may hurt me more. I do have a lot of Phaser 3s for drone defense luckily. The plasma are likely to be useful in this fight, at range 20 to the BATs I can launch and be sure of a 168 point volley hitting (minus phaser fire and scout channels). If I get to range 16 I can launch at the BATs for a 264 point impact. My problem though is that the fight is not just a case of take out the BATs, it is force the Alliance out of the zone without being so badly knackered that I can't carry on, so just diving in for that launch without regard to incoming damage is out of the question. Killing the BATs doesn't end the game so his fleet could still whack on mine afterwards.
Jack's previous attempts at defending stations have gone poorly, but I'm assuming he will have learnt from those.
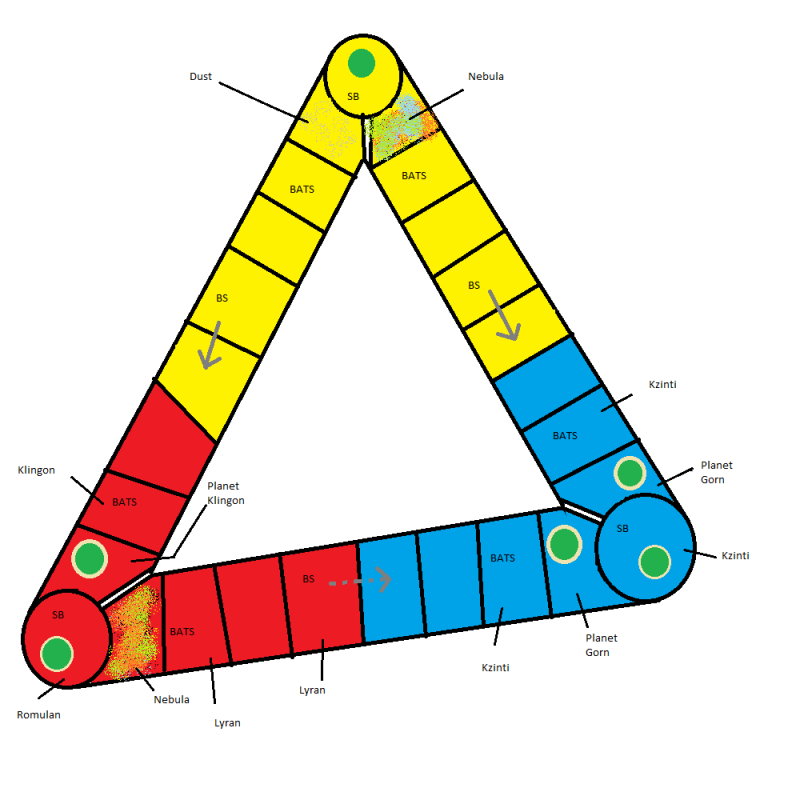
Turn 1.
I go speed 8 whilst arming the PPDs and plasma. Alliance come out at speed 16. As they reach range 25 to my CLs they launch drones and fire at one of them. It has enough batteries/power to absorb most of it (about 19), ending with 5 shield damage. His ships turn off and circle back to base. I shoot a large number of drones down as they close, no point wasting fire on him at extreme range with his scouts.
Turn 2
I move to 16, and pull off the CL being droned. As the alliance is turning away I'm going to try and pull back to make the drones drop due to range issues. The other ships will slowly edge forwards to end outside BS range, but be ready to engage the alliance if they advance again. The drones tactic works and most drones just drop. The alliance do advance out again and fire/launch at the CA this time. They even fire some extreme range photons. Again batteries absorbs a great chunk of the fire, but they have a good set of volleys and the CA ends with a fair bit of damage to its #6. Jack is somewhat annoyed that I somehow end up at range 26 to the base
. This turn I do try and fire at the enemy ships though I need 1s to do anything, I roll terribly, only getting 3 1s in 38 dice

, then I wasn't expecting much.
I think it was at the end of the turn , he got some more fire in on the CA which included a double 1 on a pair of extreme range photons! on my #1. With no battery power left that hurt.
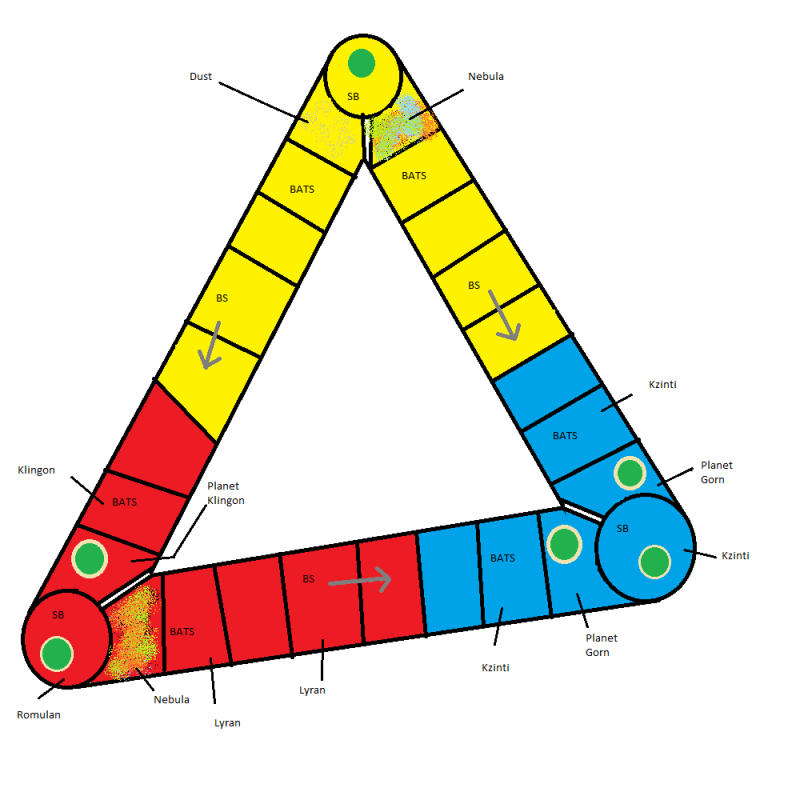
Turn 3.
There are now plenty of drones coming at the CA and plenty more that can come out over the turn. The enemy is near his base again but coming round to attack again. I clearly can't win a long range slugging match, so I'm going to head in and get the launch against the station, range 16 preferably but range 20 will do, though it will probably be only 10 plasma S as the CL that circled around is a bit behind the rest of the fleet.
As I move in the Kzinti ships fire early in the turn as they have reach range 15, and then circle back round to the base again. That leaves my CA quite badly hurting on another shield. I fire PPDs at the scout, which is also at range 15, that doesn't do quite as well as I'd hoped for, but it loses a shield and takes minor internals.
The Feds/gorn are coming up fast. The Feds have only half their photons ready, 3 being held as overloadeds,.there is also a wall of drones coming at my CA. Reaching range 20 is going to give him a range 8 shot but will allow me to turn and avoid the drones, reaching range 16 is looking dangerous as I will have to go through lots of drones, and probably get more launched at me, plus the plasma might be an issue if I try for range 16. I have to go for the range 20 launch, and see how that goes.
I launch at the base 10 Plasma S.
The Fed/Gorn then get to range 8 before I can turn and fire overloads at the CA, fortunately only 1 hits, but with some other fire my CA sees #3 down and a handful of internals. I return fire with 16 phaser 1s from my ships (that I'm about to turn out of arc) back at the Fed BC . The Alliance forget to sensor this fire (woohoo), and it almost loses #1. He then launches his Plasma at my ships (S at the DN and CA, Fs at the CLs).
In return I then launch 5 rear plasma F at the BC as it is now unable to turn fast enough to avoid some impacts after 2 or 3 impulses. They hit its #6 and #5 doing some decent internals. Some more of my phasers from my straggling CL that has now come up also hits the down shield.
The rest of the turn sees my ships out run the drones/plasma which again drop as I outrange his ships which have Emergency Decel'd in front of the BATs. They have stopped so they can shoot the plasma coming in.
The plasma run is weakened first by the Feds as it goes past them, then the stopped Kzinti as it comes up on them, and then impacts. Sensors, phaser 4s and 3s reduce the impact to just 45 points. Batteries take some and he loses a shield and a bit of armor.
We left the game there. I am way out of range, starting to reload. He is around his base, reloading photons/plasma/drones. My CA has taken 80 damage around the shields, but only a few internals. The Fed BC has more or less lost 3 shields and has taken a reasonable amount of internals, being down 9 power is nice (for me). His scout has bad shield damage on one side and some minor damage internally.
Its been a really good game so far. Jack has certainly learnt a lot from his 2 defeats and played a bad (for me) game so far, pretty much sticking to his strengths. Be interesting to see how it continues, whilst I've probably come off slightly better so far that still leaves a lot of advantages with the alliance. Its going to be hard using my CA now. On the other side the alliance will have problems using the Fed BC. I'm going to be reloading for at least 1 and maybe 2 turns, will the alliance come out to harras me? or will they take the time to reload etc as well?